yum -y install vsftpd
setup
/etc/vsftpd/vsftpd.conf
是否允許匿名登入(預設為允許)
anonymous_enable=NO
是否允許匿名登入(預設為允許)
anonymous_enable=NO
希望user登入都只能在個人目錄之下
chroot_local_user=YES
chroot_local_user=YES
如果希望讓特定user可以切換目錄,其它都不行的話,
chroot_list_enable=YES
chroot_list_file=/etc/vsftpd/chroot_list
並將特定user寫入 /etc/vsftpd/chroot_list 之中即可!!
chroot_list_enable=YES
chroot_list_file=/etc/vsftpd/chroot_list
並將特定user寫入 /etc/vsftpd/chroot_list 之中即可!!
firewall
service iptables stop
service iptables stop
chkconfig iptables off
開機啟動
chkconfig vsftpd on
手動啟動
/etc/init.d/vsftpd restart
參數說明
開機啟動
chkconfig vsftpd on
手動啟動
/etc/init.d/vsftpd restart
參數說明
http://blog.yam.com/kojoson/article/20090048
##安裝vsFTPd
##找到設定檔,vsftpd只有一隻設定檔,vsftpd.conf
並可以完全權限的控管,基於安全考量,不希望檔案大家都可以使用。
底下寫上我有使用到的config
##匿名使用者都拒絕登入
##開放本機使用者登入,chroot在自己的家目錄,並給予上傳下載的權限
##Log記錄檔,另外加開debug_ssl 以方便辨識問題所在
##系統安全性設定
##Login歡迎頁面
##SSL憑證設定
##SSL憑證建立
----切換到憑證建立位置
----建立 vsftpd 憑證,有效時間為 365 天,使用 X.509 憑證格式,若要修正參數可以編譯 Makefile
##Client connect Test
##FTP 加密模式
debug:
至於為何無法生效,這是因為在vsftpd預設的SSL加密格式為DES-CBC3-SHA
2. 如果FileZilla顯示以下錯誤時
http://shazikai.blogspot.tw/2014/02/centos-vsftpd-server.html
[CentOS] vsFTPd Server 安裝 及 使用設定
vsFTPd 在 Linux 標榜著安全性指標的 FTP,也是簡單又好用的 FTP 軟體,但在安裝 FTP Server的時候,請先了解何謂「主動式、被動式 FTP」及 SSL的「外顯式、隱含式TLS」
##安裝vsFTPd
shell> yum install vsftpd
##找到設定檔,vsftpd只有一隻設定檔,vsftpd.conf
shell> vim /etc/vsftpd/vsftpd.conf
1. 匿名使用者無法登入
2. 使用者登入後只能在自己的 /home 上傳下載
3. 使用 隱含式SSL加密
4. 上傳後的 umask=077
並可以完全權限的控管,基於安全考量,不希望檔案大家都可以使用。
底下寫上我有使用到的config
##匿名使用者都拒絕登入
anonymous_enable=NO
##開放本機使用者登入,chroot在自己的家目錄,並給予上傳下載的權限
local_enable=YES
write_enable=YES
local_umask=077
chroot_local_user=YES
chroot_list_enable=YES
chroot_list_file=/etc/vsftpd/chroot_list // 不chroot的使用者清單
##Log記錄檔,另外加開debug_ssl 以方便辨識問題所在
xferlog_enable=YES
xferlog_file=/var/log/xferlog
xferlog_std_format=NO
##系統安全性設定
connect_from_port_20=YES
idle_session_timeout=600
nopriv_user=nobody
listen=YES
pam_service_name=vsftpd
userlist_enable=YES
tcp_wrappers=YES
one_process_model=NO
use_localtime=YES
##Login歡迎頁面
banner_file=/etc/vsftpd/welcome
##SSL憑證設定
ssl_enable=YES
allow_anon_ssl=NO
force_local_data_ssl=YES
force_local_logins_ssl=YES
ssl_tlsv1=YES // 用的是TLS1.2協定
ssl_sslv2=NO
ssl_sslv3=NO
rsa_cert_file=/etc/vsftpd/vsftpd.pem // 憑證檔案,下面介紹建立方法
debug_ssl=YES
ssl_ciphers=HIGH // 憑證的加密模式,默認DES
implicit_ssl=YES // 是否啟用隱含式SSL功能,即FTPS,如果沒有設定預設會使用外顯式SSL(FTPES)
listen_port=990 // 隱含式FTP port的設定Defaul=21,但當user以隱含式SSL連接時,默認將使用990port,就會導致連接失敗。
##SSL憑證建立
----切換到憑證建立位置
shell> cd /etc/pki/tls/certs/
----建立 vsftpd 憑證,有效時間為 365 天,使用 X.509 憑證格式,若要修正參數可以編譯 Makefile
shell> make vsftpd.pem
umask 77 ; \
PEM1=`/bin/mktemp /tmp/openssl.XXXXXX` ; \
PEM2=`/bin/mktemp /tmp/openssl.XXXXXX` ; \
/usr/bin/openssl req -utf8 -newkey rsa:2048 -keyout $PEM1 -nodes -x509 -days 3650 -out $PEM2 -set_serial 0 ; \
cat $PEM1 > vsftpd.pem ; \
echo "" >> vsftpd.pem ; \
cat $PEM2 >> vsftpd.pem ; \
rm -f $PEM1 $PEM2
Generating a 2048 bit RSA private key
...................+++
............................................................+++
writing new private key to '/tmp/openssl.ye8Sir'
-----
You are about to be asked to enter information that will be incorporated
into your certificate request.
What you are about to enter is what is called a Distinguished Name or a DN.
There are quite a few fields but you can leave some blank
For some fields there will be a default value,
If you enter '.', the field will be left blank.
-----
Country Name (2 letter code) [XX]:TW
State or Province Name (full name) []:Taiwan
Locality Name (eg, city) [Default City]:Taipei
Organization Name (eg, company) [Default Company Ltd]:Company
Organizational Unit Name (eg, section) []:Group
Common Name (eg, your name or your server's hostname) []: www.fqdn.com
Email Address []: name@gmail.com
憑證這樣已經建立完成。把憑證放到vsftpd的目錄下
shell> cp vsftpd.pem /etc/vsftpd/
要注意一下權限有沒有正確唷
shell> chmod 400 vsftpd.pem
shell> ll vsftpd.pem
-rw------- 1 root root 3084 Feb 12 08:58 vsftpd.pem
##啟動 vsFTPd service
shell> service vsftpd start
shell> chkconfig vsftpd on
##Client connect Test
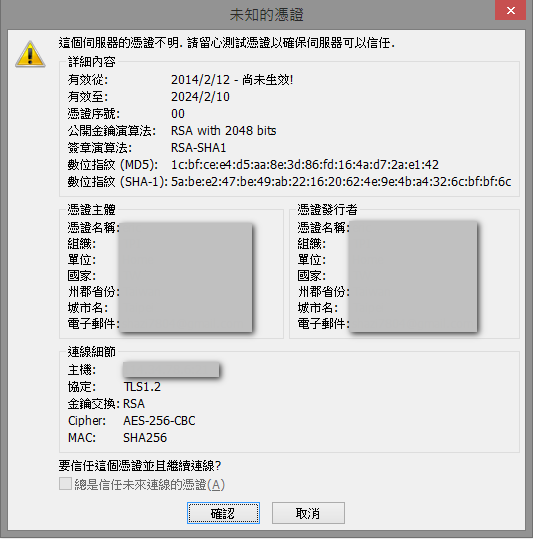
這裡使用者採用 FileZilla 進行測試,加密模式請使用隱含式 TLS
要出現上面的憑證訊息才是正確的唷!
##FTP 加密模式
1. FTP:即一般FTP未加密的模式
2. FTPS:隱含式加密(implicit),預設Port: 990
3. FTPES:外顯式加密(Explicit),預設Port: 21
debug:
在安裝vsftpd的過程中,架設FTP其實不需要特別的設置就可以啟動,如果需要使用額外的設定,還是遇到了一些問題分享。
因為使用了SSL,所以務必把debug_ssl=YES
1. 設定了SSL憑證,但是卻出現以下error訊息,而且明明使用SSL憑證,用FTPS無法登入,卻可以用SFTP登入
vsftpd.log
Wed Feb 12 00:21:27 2014 [pid 11738] DEBUG: Client "1.34.114.1", "SSL_accept failed: error:1408A0C1:SSL routines:SSL3_GET_CLIENT_HELLO:no shared cipher"
Q: 原因是憑證無法正確的生效,但我們有把SSL開啟,所以vsftpd預設以SSH的方式做加密。
至於為何無法生效,這是因為在vsftpd預設的SSL加密格式為DES-CBC3-SHA
但FileZilla2以後的版本已經不支援DES的格式了,所以我們必須在vsftpd.conf裡面將加密模式改為High
#ssl_ciphers=HIGH
2. 如果FileZilla顯示以下錯誤時
指令: PASV
回應: 227 Entering Passiv Mode (192,168,0,101,8,4)
狀態: 伺服器以無法路由的 IP Address 送出了被動式回應. 改為使用伺服器 IP Address.
指令: LIST回應: 150 Data connection created for directory listing
錯誤: 連線逾時
錯誤: 無法取得目錄列表
是FileZilla設定上出了問題,請按照以下步驟修正
選擇「設定」→「連線」→「FTP」→「被動模式」→勾選「回覆主動模式」
即可取得目錄列表
